


Edit a diagram
How to build and refine BPMN diagrams in the Bonita Process Designer editor: add elements from the palette, move and resize them, connect flows, edit labels, work with pools and lanes, use the inspector, save your work, and navigate the canvas.
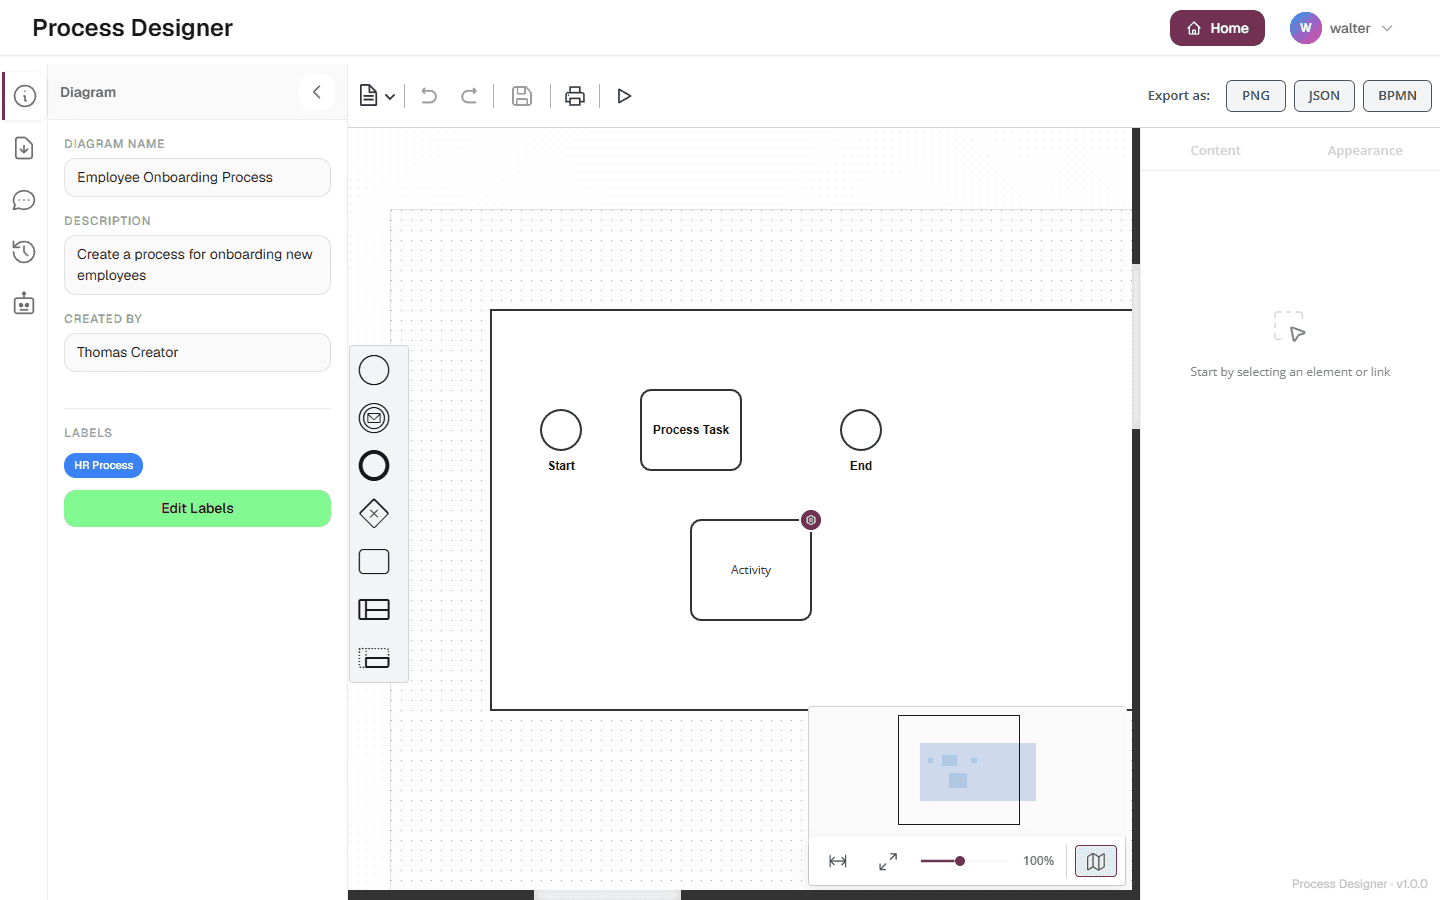
The editor is the workspace where you assemble a process. The canvas fills the centre of the screen and the palette of BPMN elements floats on its left edge. The toolbar runs across the top, with the Export as: buttons on its right. The inspector on the right shows the properties of the selected element. The narrow bar on the far left opens side panels: diagram details, import logs, comments, versions and the AI panel. The editor header shows where the process is filed.
|
To edit a diagram, you need the Creator or Admin role, and a Creator can only edit the diagrams of their own groups. Readers open the editor in view-only mode: they can pan, zoom and read, but the palette and the inspector are hidden and the editing actions are removed. See Roles and permissions. |
Add elements from the palette
The palette offers one representative shape per BPMN category: start, intermediate and end events, a gateway, a task, a pool and a lane. To add an element, drag it from the palette and drop it onto the canvas. The element is created at the drop position.
Only the curated set of elements compatible with Bonita Studio is offered. See Supported BPMN elements for the full list and why some elements are excluded.
Select, move and resize
-
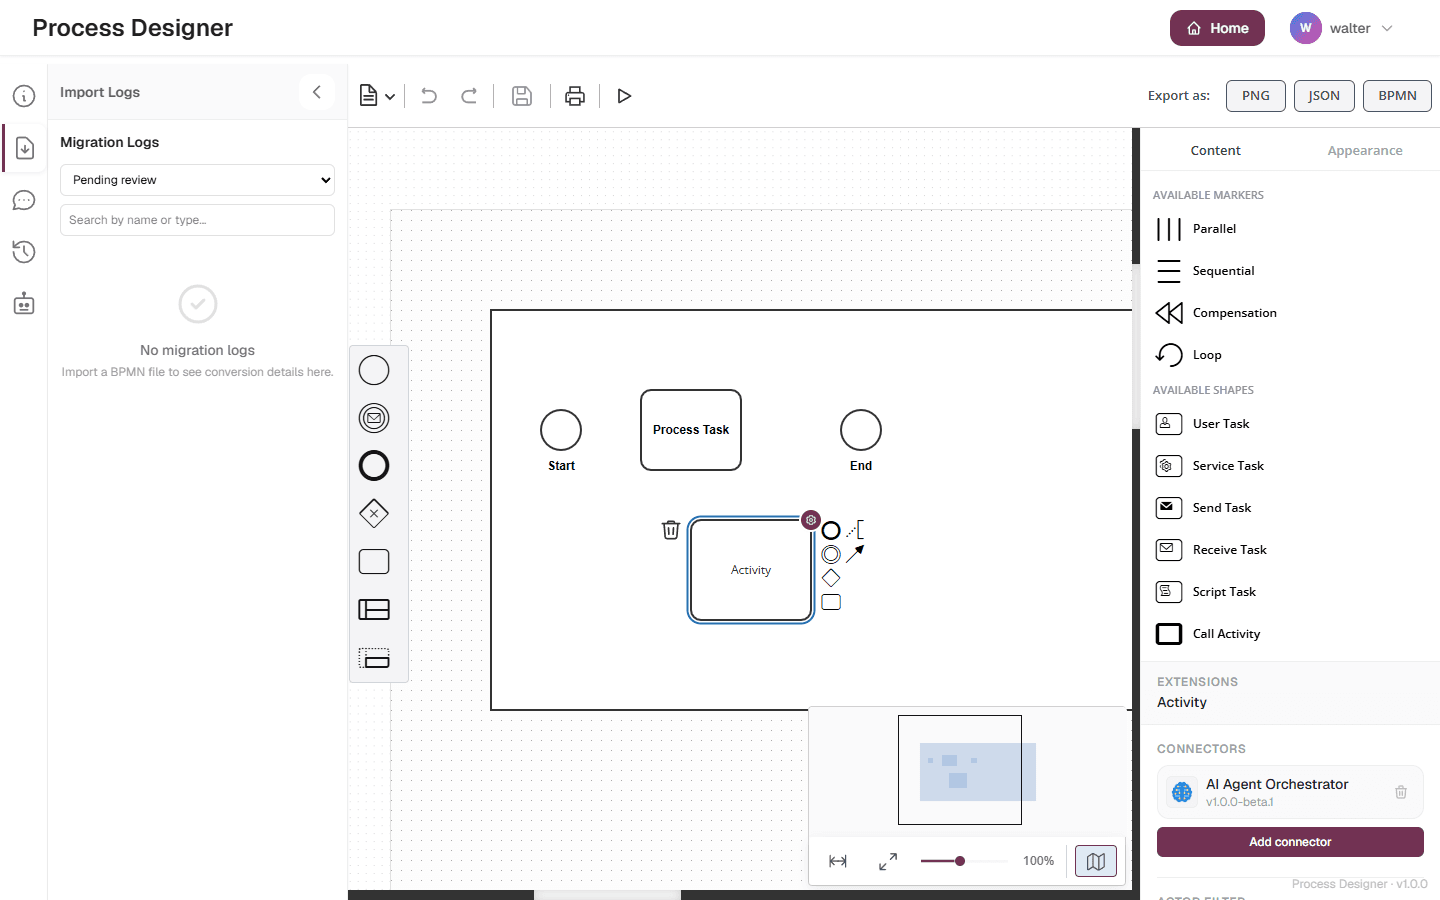
Select — click an element to select it. The selection shows resize handles and a set of tools around the element. To select several elements, hold Shift and drag a rectangle on an empty area of the canvas. Ctrl+A selects all elements.
-
Move — drag a selected element to a new position. Multiple selected elements move together.
-
Resize — drag the corner or edge handles. A minimum size is enforced so shapes stay legible.
-
Delete — select one or more elements and press Delete or Backspace, or use the delete tool next to the selected element. Deleting an element also removes the flows connected to it.
Connect elements with flows
Flows join the elements of your process.
-
Hover over the source element until its connection ports appear.
-
Click a port and drag to the target element.
-
Release over the target to create the flow.
The editor validates connections as you draw them and only allows flows that are valid for the element types involved (for example a sequence flow between activities within a pool). Invalid targets are not accepted.
Edit labels
Double-click an element to edit its text label. Type the name of the task, event or gateway, then press Enter or click away to confirm. Press Shift+Enter to start a new line. To label a flow, right-click it and choose to edit its label. Clear, descriptive labels make the diagram easier to read once you export it to Bonita Studio.
Change an element’s subtype
Many BPMN elements have subtypes — for instance an activity can be a user task or a service task, and a start event can be a message or timer start event. Select the element, then open the Content tab of the inspector: Available shapes lists the subtypes valid for that element, and Available markers the markers an activity can carry. Click one to apply it. The icon or marker on the shape updates to reflect the change.
A Call Activity is the activity subtype that calls another process. See Call other processes.
|
To attach a connector (such as a service-task connector) to an element, change the activity to a service task first, then use the marketplace connectors panel. |
Work with pools and lanes (swimlanes)
A pool represents a participant or organisation in the process; lanes (swimlanes) divide a pool into roles or responsibilities.
-
Drag a pool onto the canvas from the palette.
-
Add or remove lanes inside a pool to model the roles involved.
-
Drag activities and events into a lane to assign them to that role. Moving an element between lanes reassigns it.
Embedding and nesting rules
The editor enforces valid BPMN nesting so your diagram stays well-formed and importable:
-
Events can be embedded inside activities.
-
Activities can be placed inside pools and lanes.
-
Invalid nesting is rejected, and the editor highlights valid drop targets while you drag.
This validation is what keeps a generated or hand-built diagram compatible with Bonita Studio.
Use the inspector panel
The inspector on the right shows the properties of the selected element, so you can adjust them without leaving the canvas. It has two tabs, Content and Appearance, and the available fields depend on the element type. With nothing selected, it reads Start by selecting an element or link. Select a different element to update what the inspector displays.
Save your work
Bonita Process Designer saves your changes automatically, and you can also save at any moment.
-
Save — click the Save diagram button in the toolbar, or press Ctrl+S (Cmd+S on macOS). The button is active only while there are unsaved changes; otherwise its tooltip reads No changes to save.
-
Autosave — a few seconds after your last change, the editor saves on its own: 5 seconds by default. An administrator can set this delay between 5 and 300 seconds in Application settings.
A save is reported as successful only when the server answers it. A successful save, including an autosave, shows a brief Diagram saved notification and clears the unsaved-changes state. There is no separate save-status indicator: the Save diagram button and these notifications are the feedback.
"Successful" means that the server stored its copy of the diagram. After a network interruption, that copy can miss some of your edits: see Known issue: a dropped connection can look connected.
When a save fails, the editor shows Failed to save diagram and keeps your changes flagged as unsaved, so you are still warned before leaving and the next save tries again. When the failure is a server error, the notification also shows a Support ID: quote it if you contact your administrator or Ofelia Support. If you press Save while an autosave is already running, your save joins it and reports its result.
Other messages you may see:
-
Saved, but the preview image could not be updated — see the browser console for details — the diagram is saved, but its thumbnail on the Home page was not refreshed. When real-time collaboration is connected, this warning is the only message: the diagram is marked as saved without a Diagram saved notification.
-
AI is editing this diagram. Your changes cannot be saved right now. — another user’s AI request is changing the diagram, and you cannot change it until the request is over. Wait until it finishes, then check the diagram. See While AI is editing the diagram.
When real-time collaboration is connected, which is the normal case, your changes are also sent to the server as you make them, and the server stores the diagram a few seconds later. A Save makes it store the diagram immediately, and it refreshes the diagram’s preview image on the Home page.
Leaving with unsaved changes
If you leave the editor through the application while changes are unsaved — for example with Home or with a process in the process path — a confirmation asks what to do. When returning to Home, it reads Return to dashboard?, with Save & Exit, Exit Without Saving and Cancel. If Save & Exit fails, you stay in the editor.
Exit Without Saving (Continue Without Saving when you open another process) leaves without saving. When real-time collaboration is connected, which is the normal case, your edits already reached the server as you made them, so they are kept anyway. To drop changes, undo them before you leave.
|
The confirmation does not cover closing or reloading the browser tab, the browser’s Back button, the Admin link of the header, a search from the header, or signing out. Restoring a version does not ask either: it opens the restored copy directly. Save before you do any of these. |
Undo, redo and navigate the canvas
-
Undo — press Ctrl+Z, or use the undo button in the toolbar, to reverse your last action.
-
Redo — press Ctrl+Y, or use the redo button, to reapply an undone action.
-
Zoom — use the Slide to zoom slider in the bottom-right corner of the canvas; the current zoom level is shown next to it. You can also press Ctrl+Plus and Ctrl+Minus, or hold Ctrl and turn the mouse wheel (pinch on a trackpad). The zoom goes from 20% to 200%.
-
Fit — click Fit to screen, next to the slider, to frame the whole diagram. AI-generated diagrams fit automatically when they load.
-
Full screen — click Toggle full screen to switch the browser to full screen; the same button, now Exit full screen, switches back.
-
Minimap — the minimap above the zoom controls shows the whole diagram and the visible area; Hide minimap and Show minimap toggle it.
-
Pan — drag an empty area of the canvas, or scroll with the mouse wheel.
The undo history is maintained per editing session and is cleared when a diagram is loaded fresh.
|
When several people edit the same diagram at once, changes from other participants appear live and the server reconciles them. See Collaborate in real time for how concurrent editing and the advisory lock indicator work. |