


Install with Docker
Install and run Bonita Process Designer with Docker Compose, from the Bonita Artifact Repository or from the Docker archive: start the stack behind its TLS proxy, reach it from other machines, and back up, log and tune it.
Docker Compose is the recommended way to run Bonita Process Designer. It runs a ready-made application image, which you pull from the Bonita Artifact Repository or load from the Docker archive: nothing is built on your host, and you do not install a database or a runtime. One command starts three containers:
-
caddy— a reverse proxy that terminates HTTPS on ports 443 and 80. It is the only container reachable from outside the host. -
postgres— the PostgreSQL 16 database. -
app— the application, a single Java process that serves both the editor and the API.
Prerequisites
-
Docker Engine with the Docker Compose v2 plugin (the
docker composecommand), or Docker Desktop, installed and running. The Compose files use the top-levelname:key, which the olderdocker-composev1 command does not support. -
A host that runs Linux containers. The images are Linux images, for
amd64orarm64. Use a Linux server, or Docker Desktop on macOS, or on Windows 10 or 11 with the WSL 2 backend. The Docker engine of Windows Server runs Windows containers only: on Windows Server, use the standalone distribution. -
On Linux, a user allowed to run Docker:
root, or a member of thedockergroup. -
At least 4 GB of RAM available to Docker.
-
Ports 443 and 80 free on the host. With the plaintext HTTP opt-out, port 8080 instead.
-
Access to Docker Hub at the first start. Docker downloads the
postgres:16-alpineandcaddy:2-alpineimages the first time you rundocker compose up -d: neither the Bonita Artifact Repository nor the archive provides them. See Hosts without access to Docker Hub if the host has no such access. -
To pull the application image, access to
bonitasoft.jfrog.ioand credentials for the Bonita Artifact Repository. Without them, use the archive: see Get the application. -
Outbound internet access to register the installation and to use AI generation. Registration is a required step of the first-time setup. License activation itself works offline: it reads a
.licfile. Behind a corporate proxy, see Configure an outbound HTTP(S) proxy.
|
PostgreSQL 16 is the only supported database engine. In the Docker distribution it runs in the |
Hosts without access to Docker Hub
The postgres and caddy images are downloaded by the Docker daemon, not by Bonita Process Designer, so the outbound proxy of the application does not apply to them. The same goes for the application image when you pull it from the Bonita Artifact Repository. Use one of these options:
-
Configure the proxy of the Docker daemon itself, as described in the Docker documentation.
-
Download the two images on a machine that has access, and load them on the host. Pull them for the architecture of the host, which can differ from that of the machine that downloads them:
linux/amd64as below, orlinux/arm64for an ARM host.# On a machine with access to Docker Hub docker pull --platform linux/amd64 postgres:16-alpine docker pull --platform linux/amd64 caddy:2-alpine docker save -o base-images.tar postgres:16-alpine caddy:2-alpine # On the host, after copying base-images.tar docker load -i base-images.tar -
If your organization runs a registry mirror, pull the two images from it, and give them the names that the Compose files use:
docker pull <mirror>/postgres:16-alpine
docker tag <mirror>/postgres:16-alpine postgres:16-alpine
docker pull <mirror>/caddy:2-alpine
docker tag <mirror>/caddy:2-alpine caddy:2-alpine
Replace
<mirror>/postgresand<mirror>/caddywith the paths of the two images in your mirror.
System requirements
Size the Docker host according to how many people use the application concurrently.
| Resource | Minimum | Recommended |
|---|---|---|
CPU |
2 vCPU |
4 vCPU |
Memory |
4 GB RAM |
8 GB RAM |
Disk |
10 GB |
20 GB |
The minimum is enough to evaluate the product on a single host. Use the recommended sizing for a shared installation that several people use at the same time.
Get the application
You need two things: the Compose files, which describe the stack, and the application image. Get them in one of two ways. Both give the same stack, and the rest of this page applies to both.
-
From the Bonita Artifact Repository, when the host can reach
bonitasoft.jfrog.io: download the Compose files from this page, sign in, and Docker pulls the image when the stack starts. You download no archive. -
From the archive, for a host without access to that repository: the archive holds the Compose files and the image.
From the Bonita Artifact Repository
The application image is published in the Bonita Artifact Repository, whose access requires credentials: see How to get the credentials.
-
Create a directory for the application, and download the Compose files into it. On Linux or macOS, for example:
mkdir -p /opt/process-designer && cd /opt/process-designer
curl -fsSLO https://documentation.ofelia.com/process-designer/latest/installation/_attachments/docker-compose.yml
curl -fsSL -o Caddyfile https://documentation.ofelia.com/process-designer/latest/installation/_attachments/Caddyfile.txt
curl -fsSLO https://documentation.ofelia.com/process-designer/latest/installation/_attachments/docker-compose.http.yml
In Windows PowerShell, type
curl.exeinstead ofcurl. You can also save the files from your browser: docker-compose.yml, Caddyfile and docker-compose.http.yml. Save them in the same directory, under the namesdocker-compose.yml,Caddyfileanddocker-compose.http.yml: the documentation site serves theCaddyfileasCaddyfile.txt, and the stack does not find it under that name.docker-compose.http.ymlserves only the plaintext HTTP opt-out. Their content is shown in The Compose files. -
Sign in to the repository with your credentials:
docker login bonitasoft.jfrog.io -
Continue with Install and start the application. The first
docker compose up -ddownloads the image,bonitasoft.jfrog.io/docker/process-designer:1.1.0, for the architecture of the host: the same tag servesamd64andarm64hosts.
From the archive
Download the archive for your version and architecture from the Customer Service Center. The host needs no access to a registry.
-
Extract the archive into a directory of its own. On Linux, for example:
unzip process-designer-1.1.0-amd64.zip -d /opt/process-designer cd /opt/process-designer -
Load the application image. On Linux and macOS:
chmod +x install.sh && ./install.shOn Windows, in Windows PowerShell:
.\install.batIn cmd.exe, type
install.bat.The script runs
docker loadon the image tarball. Until the image is loaded,docker compose up -dfails on a missing image. The script then suggestsdocker compose up -d: complete the steps of Install and start the application first, because the PostgreSQL password, for example, can be changed only before the first start. -
Continue with Install and start the application.
Use the Compose files of the archive with the image of the same archive: they name the image that its install.sh loads.
What the archive contains
There is one archive per processor architecture: process-designer-<version>-amd64.zip for most servers, and process-designer-<version>-arm64.zip for ARM hosts such as Apple Silicon. The archive has no root folder. It contains:
| File | Description |
|---|---|
|
The application image. |
|
The Compose file of the default stack: |
|
The plaintext HTTP opt-out, without TLS. See Run without TLS. |
|
The configuration of the TLS proxy. |
|
Scripts that load the application image into Docker, for Linux and macOS, and for Windows. |
|
A quick start. |
Install and start the application
Run these steps from the directory that holds docker-compose.yml.
-
Get the Compose files and the image, as described in Get the application.
-
If users reach the server by any address other than
localhost, setTLS_DOMAIN, and the other variables described in Access the application from other machines. -
If the stack will be reachable outside a trusted network, set the PostgreSQL password now, as described in Security notes for the proxy and the stack: the PostgreSQL image applies it only when it creates the database, at the first start.
-
If the host reaches the internet through a proxy, configure it now, as described in Configure an outbound HTTP(S) proxy: the registration at the first sign-in needs it.
-
Start the stack:
docker compose up -dWith the Bonita Artifact Repository, this first downloads the application image.
-
Follow the application log until it shows
Started ProcessDesignerApplication:docker compose logs -f appThe database migrations run automatically at the first start, which takes longer than the next ones. Press Ctrl+C to stop following the log; the application keeps running. If
docker compose up -dreports thatbpmn-appis unhealthy, see Troubleshooting.
A new installation starts empty: there is no sample data, and a single account exists, admin with the password admin.
Open the application
Open https://<server-address> in your browser, with no port number. Replace <server-address> with localhost on the host itself, or with the host name or IP address of the server. A plain http:// address is redirected to HTTPS.
On the first visit, the browser warns that the connection is not private, or that the certificate is not trusted. This is expected: Caddy issues its own certificate, signed by an internal certificate authority that your browser does not know. Accept the warning to continue, or see Use your own certificate to remove it.
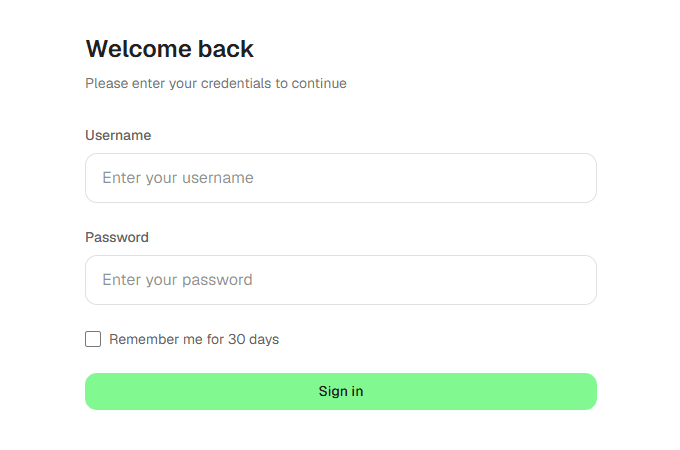
Sign in with admin / admin. You are then asked to change the password, to activate the license and to register the installation: see First-time setup.
Access the application from other machines
The shipped files are set for localhost. For any other address, set these variables to the address that users type in the browser, before you start the stack. Only TLS_DOMAIN is required; set the other two as well, as the comments of docker-compose.yml ask.
| Variable | Why |
|---|---|
|
Required. The host name or IP address that Caddy serves, for example |
|
The HTTPS origin of the application, for example |
|
The same HTTPS origin. The application does not read it in version 1.1.0; see Configuration reference. |
Set them in a file named .env, next to docker-compose.yml. Docker Compose reads it each time you run a docker compose command from that directory:
# .env
TLS_DOMAIN=pd.example.internal
CORS_ORIGIN=https://pd.example.internal
APP_FRONTEND_URL=https://pd.example.internal
You can also set them on the command line of a Linux or macOS shell, but then you must repeat them each time you recreate the containers:
TLS_DOMAIN=pd.example.internal CORS_ORIGIN=https://pd.example.internal APP_FRONTEND_URL=https://pd.example.internal docker compose up -dAfter you change a variable, run docker compose up -d again: Compose recreates the containers whose configuration changed.
Choose the image and its version
The app service of the Compose files reads two optional variables, which you set in the same .env file:
| Variable | Default | Use |
|---|---|---|
|
|
The image to run, without its tag. Set it to deploy from your own registry: see Deploy from your own registry. |
|
The version of the Compose files, |
The version to run. Leave it unset: the Compose files of each version run that version. |
|
A |
To see the image that the stack runs, run docker compose config --images.
The files of the 1.1.0 archive read neither variable: they name the image process-designer:v1.1.0, which their install.sh loads. To run another image with them, set the image: of the app service.
Deploy from your own registry
If your hosts deploy from an internal registry, copy the image there once, from a machine that can reach the Bonita Artifact Repository and your registry:
docker pull --platform linux/amd64 bonitasoft.jfrog.io/docker/process-designer:1.1.0
docker tag bonitasoft.jfrog.io/docker/process-designer:1.1.0 <registry>/process-designer:1.1.0
docker push <registry>/process-designer:1.1.0
Use linux/arm64 instead of linux/amd64 for ARM hosts. Keep the version as the tag: the Compose files add it to PD_IMAGE. On a machine without access to the Bonita Artifact Repository, load the image with the archive’s install.sh instead of pulling it, and tag the image that docker compose config --images names.
Then, on each host, set PD_IMAGE in the .env file, and sign in to your registry if it requires it:
# .env
PD_IMAGE=<registry>/process-designer
Use your own certificate
By default, Caddy issues a self-signed certificate from its own internal certificate authority. It keeps that authority in the caddy_data volume, so the certificate survives a restart or an upgrade. You have two ways to remove the browser warning.
Trust Caddy’s internal authority on the client machines. Export its root certificate, then install it among the trusted authorities of each client machine or browser:
docker compose cp caddy:/data/caddy/pki/authorities/local/root.crt caddy-root.crtUse a certificate signed by an authority your client machines already trust:
-
Create a
certs/folder next todocker-compose.yml, and put the certificate and its private key in it, ascert.pemandkey.pem.cert.pemmust hold the full chain — the server certificate followed by the intermediate certificates — and be valid for the name set inTLS_DOMAIN. -
In
docker-compose.yml, in thevolumes:of thecaddyservice, uncomment this line:- ./certs:/etc/caddy/certs:ro -
In
Caddyfile, replace the linetls internalwith:tls /etc/caddy/certs/cert.pem /etc/caddy/certs/key.pem -
Recreate the proxy:
docker compose up -d --force-recreate caddy
Run without TLS
On a trusted network, or behind a TLS proxy of your own, you can run the application over plain HTTP with docker-compose.http.yml. It starts only postgres and app, and publishes the application directly on port 8080:
docker compose -f docker-compose.http.yml up -dThen open http://<server-address>:8080. Every other docker compose command then takes the same -f docker-compose.http.yml option.
Both Compose files use the same project name and the same volumes, so they share the same database. Stop the stack with the file you started it with before you switch to the other one.
The HTTP opt-out passes fewer variables than the default file: it sets no CORS_ORIGIN and no USE_HTTPS, and it passes none of the log level or proxy variables. To set one of them, add it to the environment: of the app service in docker-compose.http.yml.
-
Always set
CORS_ORIGINto the address users type, for example- CORS_ORIGIN=http://pd.example.internal:8080. See CORS security. -
If you put your own TLS proxy in front of it, set
USE_HTTPS=trueandCORS_ORIGINto the HTTPS origin, and see TLS hardening.
|
Over HTTPS, the application tells browsers to use only HTTPS for its host, for one day. If you switch a host from the default stack to the HTTP opt-out, a browser that visited it over HTTPS in the last 24 hours keeps trying HTTPS for that host. |
Security notes for the proxy and the stack
-
Editor source map. The path
/bpmn-editor-bundle/bundle.js.mapcan be downloaded without signing in. It exposes the editor’s client-side source code, and contains no diagram or user data. If this is a concern, block that path on the proxy. With the shippedCaddyfile, add this line inside thehttps://{$TLS_DOMAIN:localhost}block, then rundocker compose restart caddy:respond /bpmn-editor-bundle/bundle.js.map 404 -
Framing. The application’s pages can be embedded in a frame only by the application itself. A page of another origin, such as a portal or an intranet page, cannot display Bonita Process Designer in a frame.
-
Database password. The PostgreSQL password is
postgresunless you set another one. Before you expose the stack outside a trusted network, set it before the first start, in the.envfile next todocker-compose.yml:# .env POSTGRES_PASSWORD=<a strong password>The Compose files of this page give it both to the
postgresservice and to the application, and the.envfile keeps it when you replace them with the files of a newer version. The PostgreSQL image applies it only when it creates the database: changing it afterwards has no effect. The files of the 1.1.0 archive do not read this variable: with them, setPOSTGRES_PASSWORDin thepostgresservice andSPRING_DATASOURCE_PASSWORDin theappservice ofdocker-compose.ymlto the same value. The database port is not published outside the Docker network. -
Default account. Change the
adminpassword at the first sign-in, as the first-time setup requires.
Common commands
Run these commands from the directory of docker-compose.yml:
# Start all services in the background
docker compose up -d

# Check service status
docker compose ps

# Follow the logs of all services, or of the application only
docker compose logs -f
docker compose logs -f app

# Restart services
docker compose restart

# Stop all services (keeps your data)
docker compose down|
|
Logs
The app service carries the application log. It is the one to read first when something misbehaves, and the one to send with a support request:
docker compose logs --no-color --timestamps app > app.logIn Windows PowerShell 5.1, > writes the file in UTF-16. Write it in UTF-8 instead:
docker compose logs --no-color --timestamps app | Out-File -Encoding utf8 app.logThe shipped docker-compose.yml caps the container logs: 500 MB for app (10 files of 50 MB), and 30 MB for caddy and postgres (3 files of 10 MB). Once a cap is reached, the oldest lines are discarded. The app container also keeps a copy of its log inside the container, bounded to 100 MB, which the diagnostic archive reads. For log levels, retention and how to trace a request, see Logs and log levels.
Memory
The application runs with a Java heap ceiling of 192 MiB (-Xmx192m), set in the image. At that ceiling, the process uses about 410 MiB of memory when idle, and more under load. If the log shows OutOfMemoryError, for example with large diagrams or many users, raise it: add the JAVA_OPTS variable to the environment: of the app service in docker-compose.yml, then run docker compose up -d:
  app:
    environment:
      # ...
      - JAVA_OPTS=-Xmx512m
At idle, each additional MiB of heap costs about half a MiB of process memory. Under load the heap fills, so plan for the new ceiling plus about 300 MiB, and make sure the host has the memory to match. JAVA_OPTS replaces the default of the image: always include an -Xmx value in it.
Back up and restore the database
All the data lives in the bpmnDB database of the postgres service. The commands below work in any shell, including Windows PowerShell, because the backup file is written inside the container and then copied out.
Take a backup while the application keeps running, with no downtime. Always take one before an upgrade, once users have stopped working:
docker compose exec -T postgres pg_dump -U postgres -Fc -f /tmp/backup.dump bpmnDB
docker compose exec -T postgres pg_restore --list /tmp/backup.dump
docker compose cp postgres:/tmp/backup.dump ./backup.dump
The second command reads the backup back: it must list the contents of the dump and end without an error. Keep backup.dump outside the Docker host.
|
To run these commands with |
Restore a backup
-
Stop the application:
docker compose stop app -
Copy the backup into the
postgrescontainer:docker compose cp ./backup.dump postgres:/tmp/backup.dump -
Recreate an empty
bpmnDBdatabase.This deletes the current database, with every change made since the backup. docker compose exec -T postgres dropdb -U postgres bpmnDB docker compose exec -T postgres createdb -U postgres bpmnDB -
Restore the backup. The command stops at the first error and, in that case, restores nothing:
docker compose exec -T postgres pg_restore -U postgres -d bpmnDB --exit-on-error --single-transaction /tmp/backup.dump -
Start the application again:
docker compose up -d
The license file is not in the database: it is kept in the bonita_licenses volume.
Configure an outbound HTTP(S) proxy
In a network without direct internet access, the application reaches the AI service and the connector marketplace through your HTTP proxy. License validation needs no network access. The proxy of the application does not apply to the Docker daemon, which downloads the postgres and caddy images, and the application image from the Bonita Artifact Repository: see Hosts without access to Docker Hub.
-
In
docker-compose.yml, in theenvironment:of theappservice, uncomment the proxy lines and set your proxy. They are shipped commented out, so settingHTTP_PROXYin the shell or in.envalone has no effect:# HTTP Proxy (uncomment if behind corporate proxy) - HTTP_PROXY=http://proxy.company.com:8080 - HTTPS_PROXY=http://proxy.company.com:8080 - NO_PROXY=localhost,127.0.0.1,postgresWith
docker-compose.http.yml, add the same lines to theenvironment:of itsappservice. -
Apply the change:
docker compose up -d -
Check the application log: at startup, it logs
Using proxy: <host>:<port>when it applies the proxy, or a warning naming the variable when it cannot read its value.
The proxy URL must include its port, as in http://proxy.company.com:8080. When both variables are set, HTTPS_PROXY is used, for every call of the application to the AI service and to the marketplace. NO_PROXY has no effect on the application: you can keep the shipped line, but nothing reads it. Calls to a Bonita Runtime, in Bonita Runtime mode, never use the proxy.
|
The application uses only the host and the port of the proxy URL. It does not send proxy credentials, so a proxy that requires authentication is not supported: allow the application’s outbound traffic through your proxy without authentication. |
If your proxy or firewall uses an allow-list, the application needs to reach:
-
the AI service: the host of
TEXT2BPMN_API_URL,pd-ai.onrender.comin the shipped files; -
the connector marketplace:
api.github.comandgithub.com, and the GitHub download hosts they redirect to (*.githubusercontent.com).
The Compose files
These are the files that From the Bonita Artifact Repository downloads, for version 1.1.0. From version 1.1.1, the archive holds the same files. The files of the 1.1.0 archive differ only in the name of the image, process-designer:v1.1.0, and in their opening comments.
docker-compose.yml
# Process Designer - Docker Compose (single-JAR)
# Version: 1.1.0
#
# Installation (see the Installation Guide, "Install with Docker"):
#   1. Get the application image, in either of two ways:
#      - from the Bonita Artifact Repository, with your credentials:
#          docker login bonitasoft.jfrog.io
#        `docker compose up -d` then pulls the image named in the `app` service;
#      - from the Docker archive, on a host without access to that repository:
#        run install.sh (Linux, macOS) or install.bat (Windows), which load the
#        image tarball into Docker.
#
#   2. Start the application:
#      docker compose up -d
#
# Access (replace <server-address> with your server's IP or hostname):
#   - https://<server-address>   (TLS terminated by the bundled caddy proxy)
#     A self-signed certificate is issued on first boot — accept the one-time
#     browser warning, or bring your own cert (see Caddyfile). When access is
#     not via localhost, set TLS_DOMAIN, CORS_ORIGIN and APP_FRONTEND_URL in a
#     .env file next to this one, before you start the stack:
#       TLS_DOMAIN=<server-address>
#       CORS_ORIGIN=https://<server-address>
#       APP_FRONTEND_URL=https://<server-address>
#   Plaintext HTTP opt-out (no TLS): docker compose -f docker-compose.http.yml up -d
#
# Image (optional, in the same .env file):
#   PD_IMAGE    the image to run without its tag, to deploy from your own
#               registry, e.g. PD_IMAGE=registry.example.com/process-designer
#   PD_VERSION  pins the version. Leave it unset to run the version of this
#               file: a pinned PD_VERSION outlives an upgrade of this file.
#
# Database password (in the same .env file, BEFORE the first start):
#   POSTGRES_PASSWORD  defaults to postgres. Set it before you expose the stack
#                      outside a trusted network. PostgreSQL applies it only
#                      when it creates the database: changing it later has no
#                      effect. Keeping it in .env, not in this file, means it
#                      survives replacing this file on an upgrade.
#
# AI service (optional, in the same .env file):
#   TEXT2BPMN_API_URL  the AI service the application calls, by default
#                      https://pd-ai.onrender.com/v1. Change it only when
#                      Ofelia gives you another address.
#
# Default credentials:
#   - Username: admin
#   - Password: admin (you'll be prompted to change it)
#
# LOG RETENTION (BPA-816). Docker's default json-file driver is UNBOUNDED:
# before this, the compose you are reading pinned nothing and container logs
# grew until the disk did. Each service now declares a cap. That is a
# deliberate behaviour change — logs are discarded once the budget is
# reached — and the budgets are BYTES, not days:
#   app     50 MB x 10 = 500 MB. The diagnostic window: this is the log
#           Bonitasoft Support asks for, sized so an incident reported the
#           following week is normally still in it. How many days it buys
#           depends on your traffic and LOG_LEVEL.
#   others  10 MB x 3 = 30 MB. A safety cap, not a diagnostic window.
# Collect the diagnostic log with:  docker compose logs app > pd-logs.txt
# Shipping to your own aggregator? Override `driver:` and set retention
# there. See the Installation Guide, "Diagnostic evidence and how long it
# lasts". The app container also keeps a bounded 100 MB copy of its own log
# inside the container (/var/log/process-designer/app.log).

name: process-designer

services:
  # TLS reverse proxy — terminates HTTPS and proxies the single origin to
  # the app (UI + API served on one port). Self-signed cert by default.
  caddy:
    image: caddy:2-alpine
    container_name: bpmn-caddy
    ports:
      - "443:443"
      - "80:80"
    environment:
      # Host clients use to reach the box (default localhost). Set to
      # your IP/hostname for remote access; the internal CA issues a
      # cert for it. Pair with CORS_ORIGIN + APP_FRONTEND_URL.
      - TLS_DOMAIN=${TLS_DOMAIN:-localhost}
    volumes:
      - ./Caddyfile:/etc/caddy/Caddyfile:ro
      - caddy_data:/data
      - caddy_config:/config
      # Bring your own cert: mount it here and switch the Caddyfile
      # `tls internal` line to point at cert.pem/key.pem.
      # - ./certs:/etc/caddy/certs:ro
    # Safety cap — see the LOG RETENTION note at the top of this file.
    logging:
      driver: json-file
      options:
        max-size: "10m"
        max-file: "3"
    depends_on:
      app:
        condition: service_healthy
    networks:
      - bpmn-network
    restart: unless-stopped

  postgres:
    image: postgres:16-alpine
    container_name: bpmn-postgres
    volumes:
      - postgres_data:/var/lib/postgresql/data
    environment:
      # Set POSTGRES_PASSWORD in .env before the first start: see "Database
      # password" at the top of this file. The app service reads the same variable.
      - POSTGRES_USER=postgres
      - POSTGRES_PASSWORD=${POSTGRES_PASSWORD:-postgres}
      - POSTGRES_DB=bpmnDB
    # Safety cap — see the LOG RETENTION note at the top of this file.
    logging:
      driver: json-file
      options:
        max-size: "10m"
        max-file: "3"
    healthcheck:
      test: ["CMD-SHELL", "pg_isready -U postgres -d bpmnDB"]
      interval: 10s
      timeout: 5s
      retries: 5
      start_period: 10s
    networks:
      - bpmn-network
    restart: unless-stopped

  app:
    # PD_IMAGE / PD_VERSION: see "Image" at the top of this file.
    image: ${PD_IMAGE:-bonitasoft.jfrog.io/docker/process-designer}:${PD_VERSION:-1.1.0}
    container_name: bpmn-app
    # No host port: reached only via the caddy proxy. The single JAR
    # serves the UI and the API on one port (8080).
    environment:
      - PORT=8080
      # Flyway migrations run automatically at Spring Boot startup
      - DATABASE_URL=jdbc:postgresql://postgres:5432/bpmnDB
      - SPRING_DATASOURCE_USERNAME=postgres
      - SPRING_DATASOURCE_PASSWORD=${POSTGRES_PASSWORD:-postgres}
      - TEXT2BPMN_API_URL=${TEXT2BPMN_API_URL:-https://pd-ai.onrender.com/v1}
      # CORS / allowed origin. Behind the TLS proxy the browser origin is
      # the proxy host on :443 (no port), so CORS_ORIGIN MUST be the https
      # origin (the Host-derived host:8080 would not match). Defaults to
      # https://localhost; override for your address:
      #   CORS_ORIGIN=https://<server-address>
      - CORS_ORIGIN=${CORS_ORIGIN:-https://localhost}
      # Frontend URL used to build editor deep links in API responses
      - APP_FRONTEND_URL=${APP_FRONTEND_URL:-https://localhost}
      # HTTPS on by default (Secure + SameSite=None cookie); the caddy proxy
      # terminates TLS and the app reads X-Forwarded-Proto.
      - USE_HTTPS=${USE_HTTPS:-true}
      # License folder (upload a .lic via Admin -> License; persisted below).
      - BONITA_LICENSE_FOLDER=/opt/bonita/licenses
      # Log verbosity (optional, pass-through). LOG_LEVEL sets the application
      # package (com.bonitasoft.processdesigner), LOG_LEVEL_ROOT everything else,
      # LOG_LEVEL_TOMCAT_HTTP the container's own request-rejection loggers (at
      # INFO they write the rejected request target, header line and query
      # parameter — see docs/LOGGING.md before shipping such a log to Support).
      # Left unset here so application.yml's defaults apply unless exported.
      - LOG_LEVEL
      - LOG_LEVEL_ROOT
      - LOG_LEVEL_TOMCAT_HTTP
      # HTTP Proxy (uncomment if behind corporate proxy)
      # - HTTP_PROXY=http://proxy.company.com:8080
      # - HTTPS_PROXY=http://proxy.company.com:8080
      # - NO_PROXY=localhost,127.0.0.1,postgres
    volumes:
      - bonita_licenses:/opt/bonita/licenses
    # THE diagnostic window — 50 MB x 10 = 500 MB. This is the log to send
    # to Support: docker compose logs app > pd-logs.txt
    logging:
      driver: json-file
      options:
        max-size: "50m"
        max-file: "10"
    depends_on:
      postgres:
        condition: service_healthy
    healthcheck:
      test: ["CMD-SHELL", "wget -qO- http://localhost:8080/installation || exit 1"]
      interval: 30s
      timeout: 10s
      retries: 3
      start_period: 90s
    networks:
      - bpmn-network
    restart: unless-stopped

networks:
  bpmn-network:
    driver: bridge

volumes:
  postgres_data:
    driver: local
  bonita_licenses:
  caddy_data:
  caddy_config:
Caddyfile
# Bonita Process Designer — default-on TLS reverse proxy (BPA-574).
# Terminates TLS on :443 and proxies everything to the single-JAR app on
# :8080 (it serves the UI and the API — incl. the /ws WebSocket — on one
# same-origin port). :80 redirects to HTTPS. Self-signed internal-CA cert
# by default (no DNS/ACME needed) — accept the browser warning or bring
# your own cert by mounting cert.pem/key.pem and switching the `tls` line.
# Set TLS_DOMAIN to the IP/hostname clients use (default localhost) so the
# internal CA issues a cert for it; a port-only :443 site has no name to
# issue for and fails the handshake.
{
	auto_https disable_redirects
}
https://{$TLS_DOMAIN:localhost} {
	tls internal
	encode gzip
	reverse_proxy app:8080
}
:80 {
	redir https://{host}{uri} permanent
}
docker-compose.http.yml
# Process Designer - Docker Compose (single-JAR, plaintext HTTP opt-out)
# Version: 1.1.0
#
# No TLS: the app is published directly on http://<server-address>:8080.
# Use only on a trusted network or behind your own TLS-terminating proxy.
#   docker compose -f docker-compose.http.yml up -d
# The image is obtained as for docker-compose.yml (docker login, or the
# archive's install script), and PD_IMAGE / PD_VERSION apply the same way.
#
# LOG RETENTION (BPA-816): same caps and same rationale as
# docker-compose.yml — app 50 MB x 10 (the diagnostic window Support asks
# for), postgres 10 MB x 3 (a safety cap). Bytes, not days. Without them
# Docker's json-file driver is unbounded.

name: process-designer

services:
  postgres:
    image: postgres:16-alpine
    container_name: bpmn-postgres
    volumes:
      - postgres_data:/var/lib/postgresql/data
    environment:
      - POSTGRES_USER=postgres
      - POSTGRES_PASSWORD=${POSTGRES_PASSWORD:-postgres}
      - POSTGRES_DB=bpmnDB
    logging:
      driver: json-file
      options:
        max-size: "10m"
        max-file: "3"
    healthcheck:
      test: ["CMD-SHELL", "pg_isready -U postgres -d bpmnDB"]
      interval: 10s
      timeout: 5s
      retries: 5
      start_period: 10s
    networks:
      - bpmn-network
    restart: unless-stopped

  app:
    image: ${PD_IMAGE:-bonitasoft.jfrog.io/docker/process-designer}:${PD_VERSION:-1.1.0}
    container_name: bpmn-app
    ports:
      - "8080:8080"
    environment:
      - PORT=8080
      - DATABASE_URL=jdbc:postgresql://postgres:5432/bpmnDB
      - SPRING_DATASOURCE_USERNAME=postgres
      - SPRING_DATASOURCE_PASSWORD=${POSTGRES_PASSWORD:-postgres}
      - TEXT2BPMN_API_URL=${TEXT2BPMN_API_URL:-https://pd-ai.onrender.com/v1}
      - BONITA_LICENSE_FOLDER=/opt/bonita/licenses
    volumes:
      - bonita_licenses:/opt/bonita/licenses
    # THE diagnostic window — 50 MB x 10 = 500 MB.
    logging:
      driver: json-file
      options:
        max-size: "50m"
        max-file: "10"
    depends_on:
      postgres:
        condition: service_healthy
    healthcheck:
      test: ["CMD-SHELL", "wget -qO- http://localhost:8080/installation || exit 1"]
      interval: 30s
      timeout: 10s
      retries: 3
      start_period: 90s
    networks:
      - bpmn-network
    restart: unless-stopped

networks:
  bpmn-network:
    driver: bridge

volumes:
  postgres_data:
    driver: local
  bonita_licenses:
Troubleshooting
The entries below cover the most common problems. If none of them solves yours, contact Support, as described in Get support. Send the output of docker compose ps, the application log exported as described in Logs and, after an upgrade, the 1.0.x version you upgraded from. For an HTTPS problem, also send the output of docker compose logs --no-color caddy, once you have reviewed it: see The proxy log.
dependency failed to start: container bpmn-app is unhealthy-
The first start, or the first start after an upgrade, runs the database migrations and can outlast the health check of the
appcontainer. Caddy then does not start. Readdocker compose logs app: when it showsStarted ProcessDesignerApplication, rundocker compose up -dagain. If you are upgrading, do not go back to 1.0 while the application is still migrating. If the log shows anERRORand the application starts over and over (the STATUS column ofdocker compose psshowsRestartingforapp), see The application stops during startup after an upgrade below. - The application stops during startup after an upgrade
-
Read
docker compose logs app: it names the failing migration. A migrationV26failure means the import log check was skipped. From the 1.1 directory, run the count query of that check and, if the count is not zero, theDELETEquery, as described in Stop 1.0 and back it up. Then rundocker compose up -dagain: the application runs the remaining migrations at its next start. password authentication failed for user "postgres"-
The application does not use the password the database was created with. The PostgreSQL image applies the password only when it creates the database, at the first start: changing it afterwards has no effect. Set
POSTGRES_PASSWORDin the.envfile back to the password the database was created with, then rundocker compose up -d. With the files of the 1.1.0 archive, setPOSTGRES_PASSWORDandSPRING_DATASOURCE_PASSWORDindocker-compose.ymlinstead. error from registry: The client does not have permission for manifest-
Docker cannot pull the application image from the Bonita Artifact Repository: it is not signed in, or the credentials do not give access to it. Run
docker login bonitasoft.jfrog.iowith the credentials described in From the Bonita Artifact Repository, thendocker compose up -dagain. On a host without access to that repository, use the archive and run itsinstall.shorinstall.batfirst. If you setPD_VERSION, check that this version exists: see Choose the image and its version. pull access denied for process-designer-
You start the files of the 1.1.0 archive, and its image is not loaded. Run
install.shorinstall.batfrom the directory of the archive, thendocker compose up -dagain. - Docker cannot download
postgresorcaddy -
The host has no access to Docker Hub. See Hosts without access to Docker Hub.
- Every user is sent to the license page
-
No valid license is installed. An Admin installs it from that page: see Manage the license. After an upgrade from 1.0.0, upload the
.licfile that you copied to thelicenses-1.0.0folder: see Start 1.1. - The browser cannot open an HTTPS connection
-
Check, in this order:
-
Read the output of
docker compose up -d. If it reports that port 443 or 80 is already allocated, another service of the host uses it: stop that service, then rundocker compose up -dagain. If it reportscontainer bpmn-app is unhealthy, seedependency failed to start: container bpmn-app is unhealthyabove. -
TLS_DOMAINmatches the name typed in the address bar. If it does not, set it, then rundocker compose up -d. See Access the application from other machines.
-
- The pages load but actions fail, or changes do not appear in real time, behind your own reverse proxy
-
Your proxy does not forward the original host and scheme. Forward
X-Forwarded-Proto, and either preserve theHostheader or forwardX-Forwarded-Host. If users do not see each other’s changes in real time, the proxy does not forward WebSocket connections on/ws. See TLS hardening.
Upgrade
To upgrade an existing installation, see Upgrade Process Designer.
Next steps
-
First-time setup — change the default password, activate the license, register the installation, and enable AI generation.
-
Configuration reference — every environment variable, and where to set it in the Docker distribution.
-
Installation — compare deployment modes and choose another option if Docker is not available.