


Create your first diagram
Build a BPMN diagram from scratch in Bonita Process Designer: create the diagram with the creation wizard, drag elements from the palette, connect and label them, add a pool with lanes, save, then export.
This walkthrough takes you from an empty canvas to a complete, exportable BPMN diagram. It assumes you are signed in with a Creator or Admin role (a Reader can open and view diagrams but not create or edit them). If you would rather have a diagram drafted for you from a written description, see Generate a diagram with AI instead.
Before you start
To create and edit diagrams you need:
-
A running Bonita Process Designer instance and an account that can sign in.
-
The Creator or Admin role. A Creator also needs to belong to at least one group. Diagrams are scoped to the groups you belong to.
For a tour of the screens referenced below, see Interface overview.
Step 1: Create the diagram
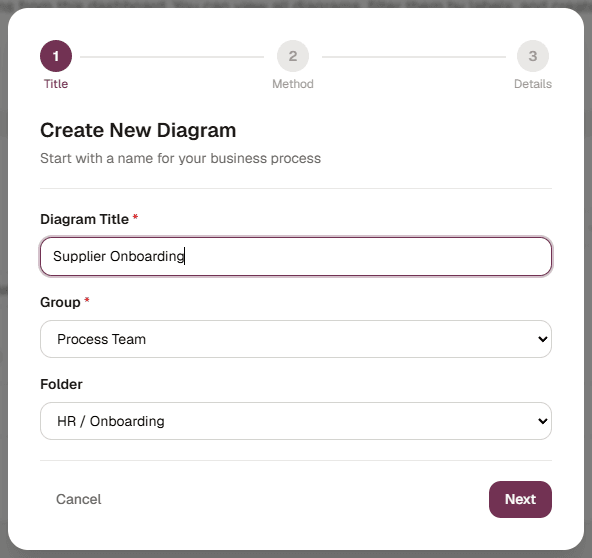
The Create New Diagram wizard has three steps: Title, Method and Details. Starting from scratch only needs the first two.
-
On the Home page, click Create New Diagram.
-
On the first screen, fill in the fields:
-
Diagram Title — the name of the diagram. It is required.
-
Group — the group the diagram belongs to. A Creator must choose one of their groups; an Admin can also choose — No group —.
-
Folder — shown when the chosen group has folders. The wizard proposes the folder you are in; choose — No folder — to file the diagram at Home, the top level (see Organize processes in folders).
-
-
Click Next.
-
On the How would you like to start? screen, choose From Scratch (Start with a blank canvas).
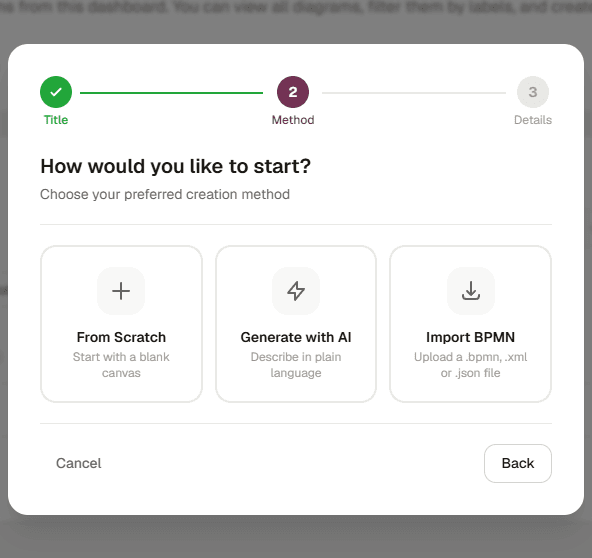
The diagram is created and opens in the editor on an empty canvas.
The other two choices lead to the wizard’s third screen, whose label then becomes AI Prompt or Import: Generate with AI asks for a description of the process (see Generate a diagram with AI), and Import BPMN asks for a .bpmn, .xml or .json file to load (see Export and import diagrams).
Titles do not have to be unique: two diagrams can have the same title, for example in different folders. A distinct title still makes a diagram easier to find, and it matters when you export to Bonita Studio: see Processes with the same name.
Step 2: Add elements from the palette
The palette on the left edge of the canvas offers the available BPMN elements: events, a gateway, a task, a pool and a lane.
-
Find the element you need in the palette.
-
Drag it onto the canvas and release at the position where you want it.
-
Repeat to add the other elements of your process — for example a start event, one or more tasks, a gateway, and an end event.
Only the BPMN elements compatible with Bonita Studio are offered. For the full list, see Supported BPMN elements.
Step 3: Connect the elements with flows
Flows define the order in which elements run.
-
Hover over the source element until its connection points appear.
-
Drag from a connection point to the target element.
-
Release on the target to create the flow.
Connections are validated as you draw them: only valid links between compatible elements are accepted. To reorder or reroute a flow later, see Edit a diagram.
Step 4: Label the elements
Give each element a meaningful name.
-
Double-click an element to edit its label.
-
Type the name, then press Enter or click elsewhere on the canvas to confirm.
Clear labels make a diagram easier to read and produce a cleaner export to Bonita Studio.
Step 5: Add a pool and lanes
Pools and lanes (swimlanes) group activities by participant or responsibility.
-
Drag a pool from the palette onto the canvas.
-
Add lanes inside the pool — one per participant, role, or system.
-
Drag your existing elements into the appropriate lane.
A pool contains lanes, and activities sit inside lanes. Bonita Process Designer validates this nesting: an element can only be dropped where it is allowed.
Step 6: Save
Bonita Process Designer saves your changes automatically a few seconds after your last change, and you can save at any moment with the Save diagram button in the toolbar, or with Ctrl+S (Cmd+S on macOS). Each successful save shows a brief Diagram saved notification. See Save your work.
Step 7: Export the diagram
When the diagram is ready, export it to use elsewhere. The Export as: buttons are on the right of the editor toolbar:
-
PNG — an image of the diagram.
-
JSON — the raw diagram, to re-import into Bonita Process Designer later.
-
BPMN — a BPMN 2.0 XML file (
.bpmn), the Bonita Studio-compatible format. -
BPMN+ — this process and everything filed under it, as one BPMN file.
The file downloads to your computer. You can also print the diagram with the Print button of the toolbar. For the details of each format, import, and the element conversion that happens on import, see Export and import diagrams.
Next steps
-
Edit a diagram — moving, resizing, changing subtypes, the inspector panel, saving, undo/redo, zoom and pan.
-
Export and import diagrams — every export and import option, including Bonita Studio compatibility notes.